 MY
MY  ID
ID EN
EN SG
SG
This guide is designed to help you understand the complete ordering process on seedbacklink. Follow the steps below to create a campaign, fill in your order details, and complete the payment process easily.
Register to Your seedbacklink Account
Before creating an order, make sure you already have a seedbacklink account. If you don’t have one yet, please register first. You can follow the registration tutorial through this link: https://panel.seedbacklink.com/
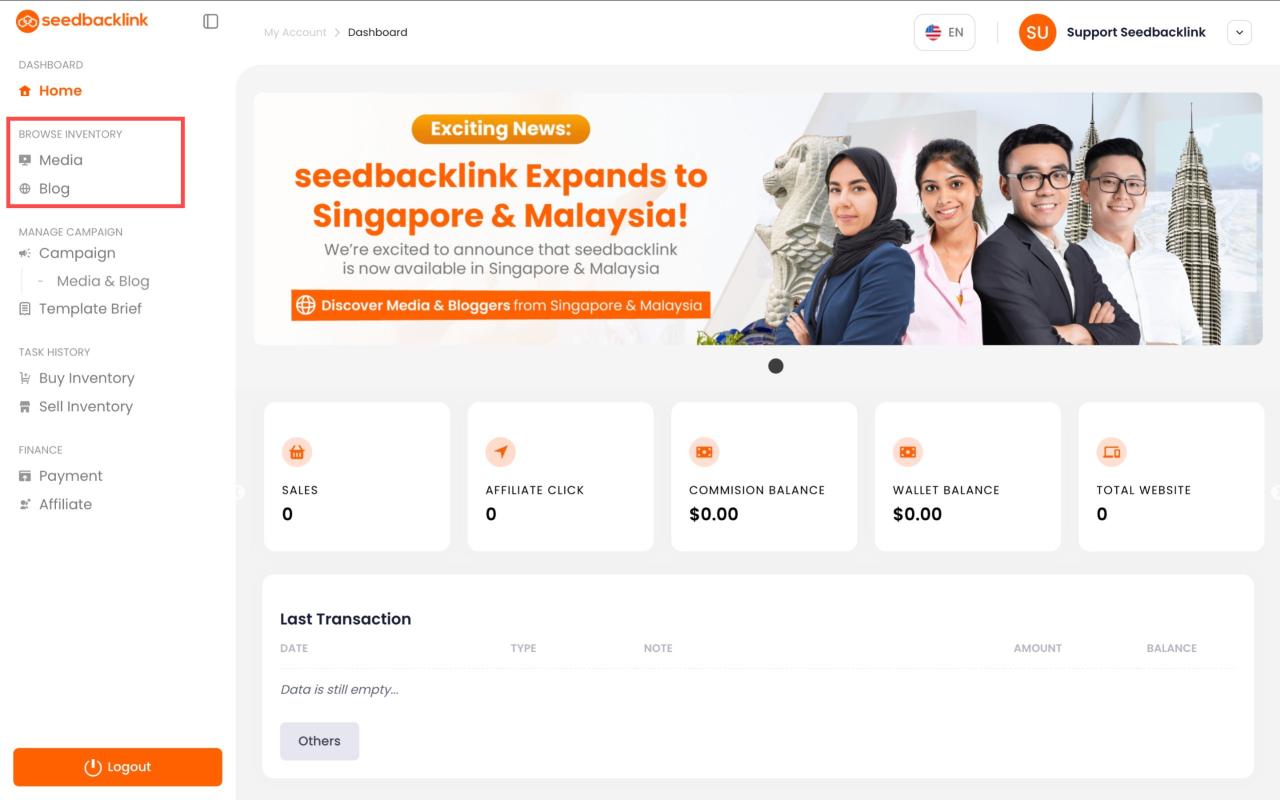
After logging in successfully, you will be directed to the Dashboard page, as shown in the image below.
From this page, you can start exploring the available inventory. Select Media if you want to publish an article on an online media website, or select Blog if you want to collaborate with bloggers based on your campaign needs.
If you only want to order 1 media, simply move your cursor to the right side of the selected media and click the cart icon to add it to your campaign.
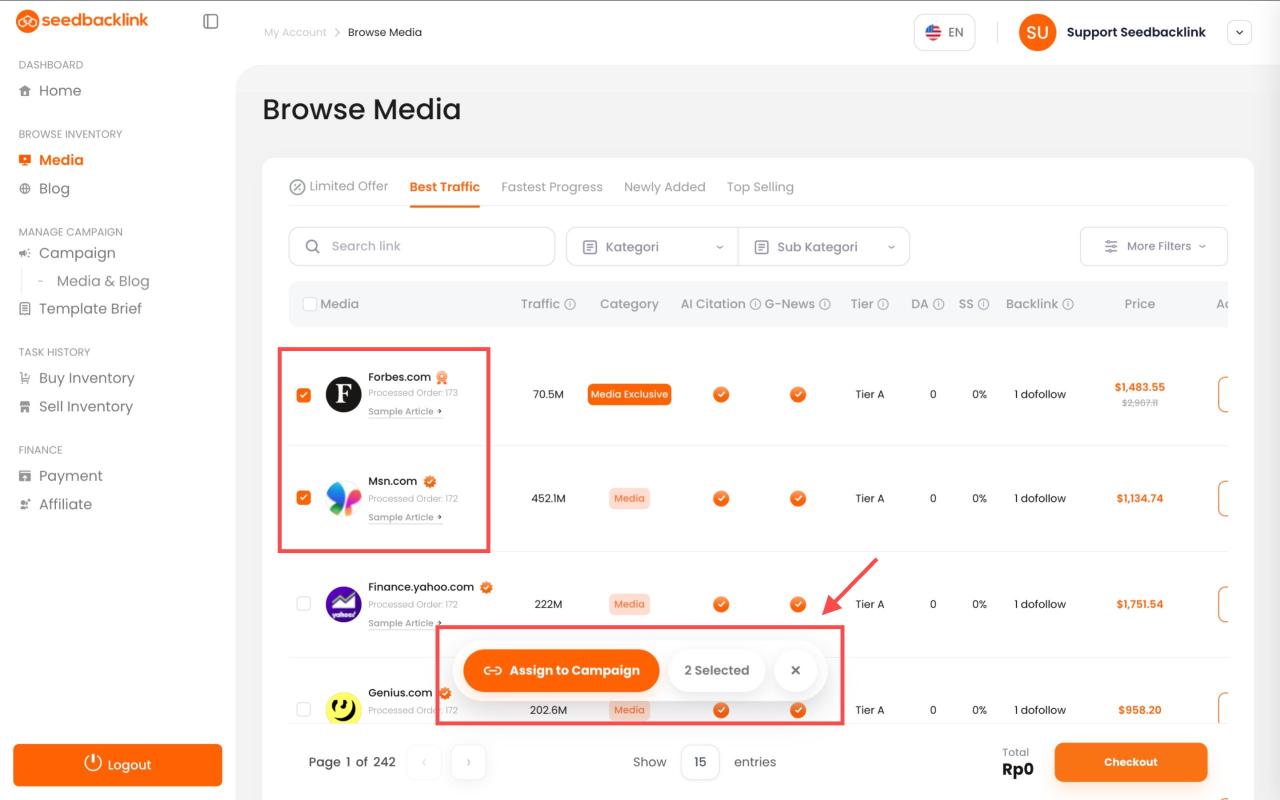
If you want to order more than 1 media at once, tick the checkbox for each media you want to select. Once you have selected all the media, click the Assign to Campaign button that appears at the bottom of the page to add them all to your campaign.
Tip: Take some time to compare several media or blogs so you can choose websites that best match your promotion goals and budget.
Choose Media or Blog
After finding the media you want to use, move your cursor to the right side and click the cart icon to start creating a new campaign.
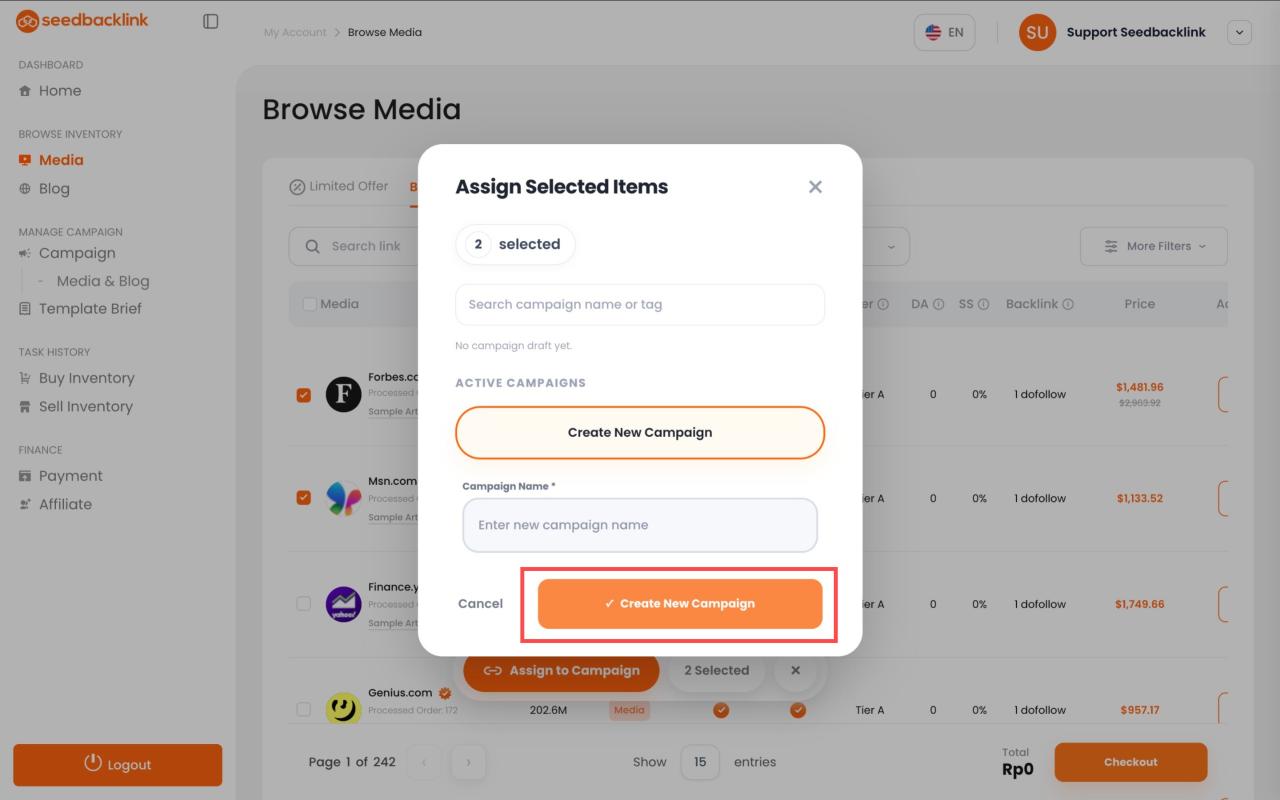
After clicking the cart button, you will be directed to the Create New Campaign page. Enter the campaign name based on the brand, website, or product you want to promote.
Once the campaign name has been entered, click the Create New Campaign button again to save the campaign and continue with the ordering process.
Tip: Use a clear campaign name, such as seedbacklink, Brand ABC, or Product XYZ, so your campaigns are easier to manage when you have multiple campaigns.
Using an Existing Campaign
Besides creating a new campaign, you can also add media or blogs to a campaign that you have created previously. This feature is useful if you want to continue using the same campaign without creating a new one.
If you want to add media or blogs to an existing campaign, click the cart icon. You will then be asked to choose the Media or Blog category you want to add.
After selecting the category, you can choose the campaign you want to use. If the campaign you previously selected already has a Done status, it will automatically be changed back to Draft because new media or blogs have been added to the campaign.
Edit the Draft Campaign
After the campaign has been created successfully, open the Manage Campaign menu on the left side, then select Media & Blog. On this page, you will see all the campaigns you have created.
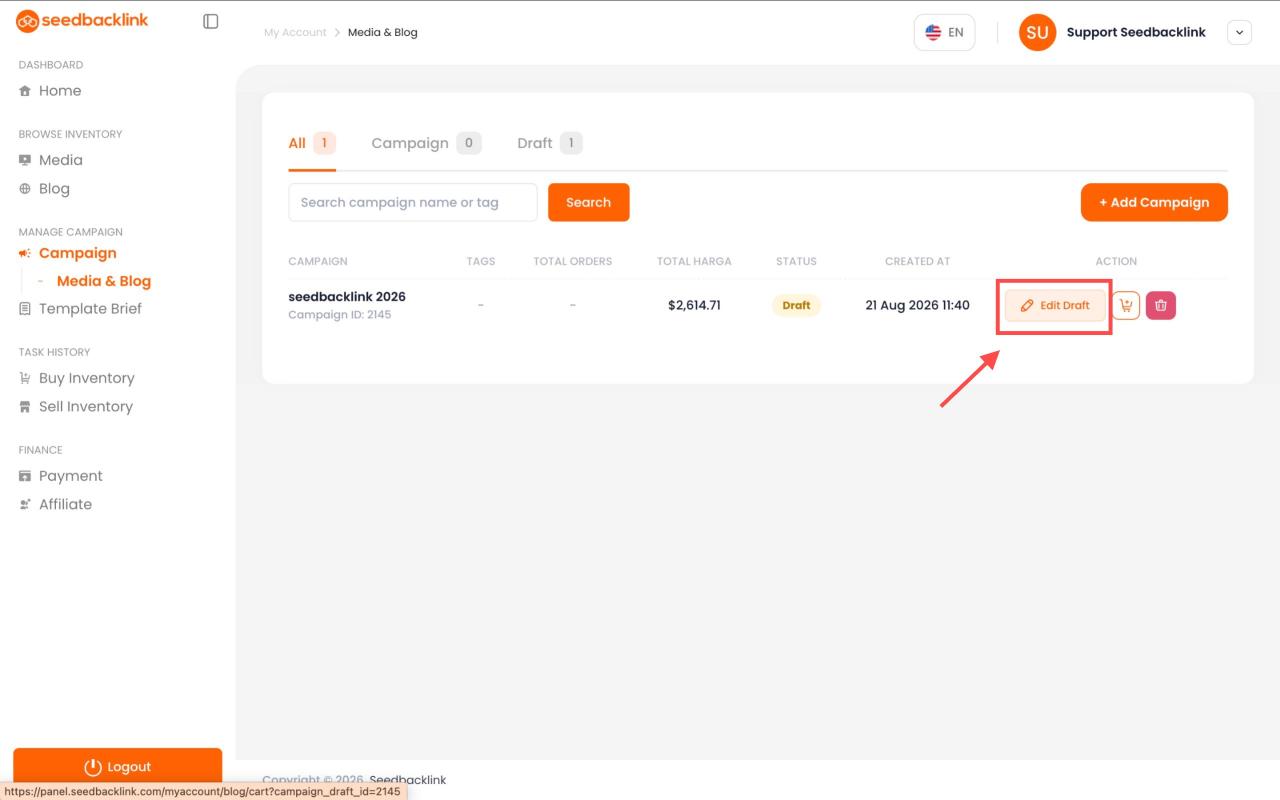
To continue the ordering process, click the Edit Draft button on the campaign you want to work on.
Complete the Campaign Details
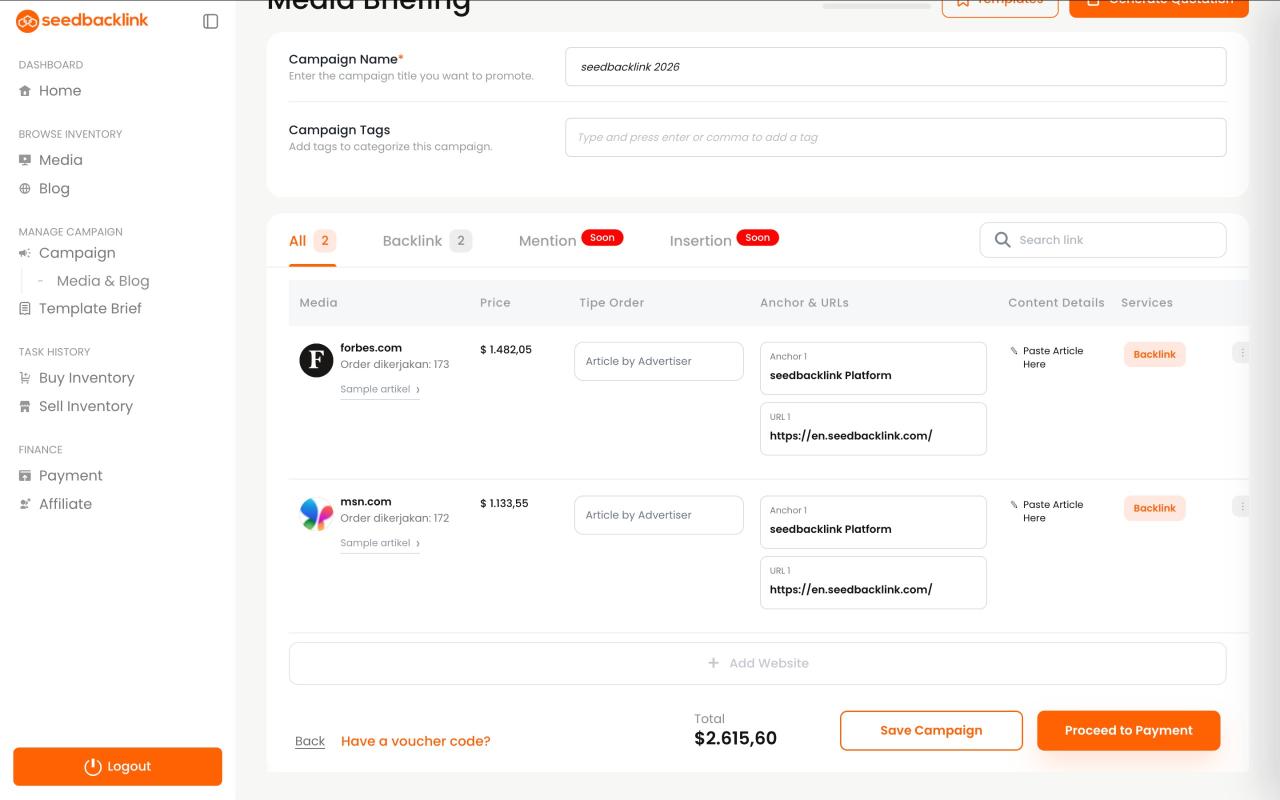
Once you are on the Media Briefing page, complete the required campaign information before proceeding to payment. Fill in the following sections:
- Campaign Name: Enter the campaign name based on the brand or website you want to promote.
- Campaign Tags: Add tags to make it easier to organize your campaigns.
- Order Type: Choose one of the available order types; Article from Advertiser, if you have prepared the article yourself, or Article from Publisher, if you want the publisher to create the article for you. The latter option will incur an additional fee according to the media’s terms.
- Anchor Text & URL: Enter the anchor text and destination URL. The number of available fields will depend on the media’s backlink policy. For example, if the media provides 1 dofollow link, only 1 anchor text and URL field will be available. If the media provides 2 dofollow links, 2 fields will appear.
- Detail Content: After completing the information above, continue by filling in the Detail Content section based on your campaign needs. You can add a brief or the article to be published, depending on the order type you selected.
Save the Article and Proceed to Payment
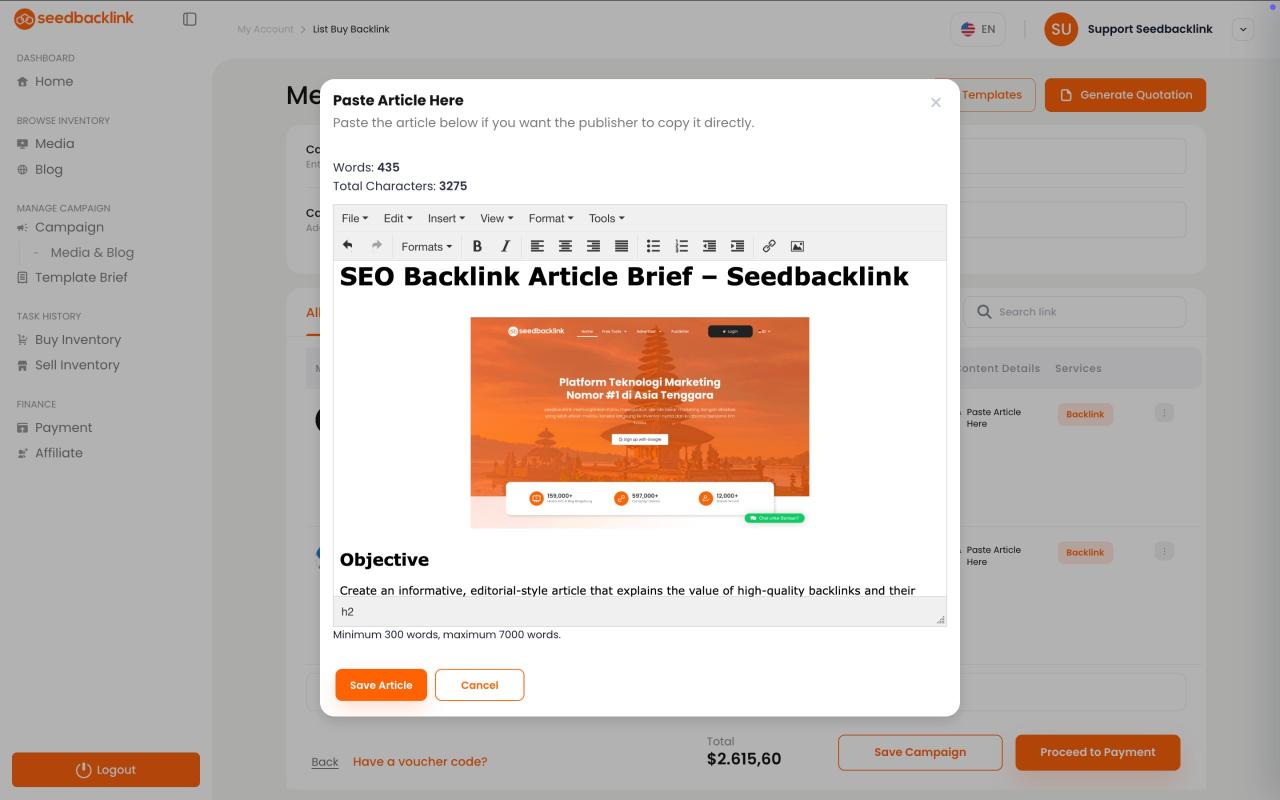
After filling in the article or brief in the Detail Content section, click the Save Article button to save the content.
Make sure all the information you entered is correct, including the Campaign Name, Order Type, Anchor Text, URL, and the article or brief.
If everything is correct, close the editor window and click Proses Pembayaran to proceed to checkout and complete your order.
Tip: You can copy and paste your draft directly into the rich editor. Images and links can also be copied along with the content, making it easier to fill in the article.
Create a Brief Template (Reusable)
If you often use the same brief for multiple media or blog orders, you can create a Brief Template so you don’t have to enter the same brief from scratch every time you create a campaign.
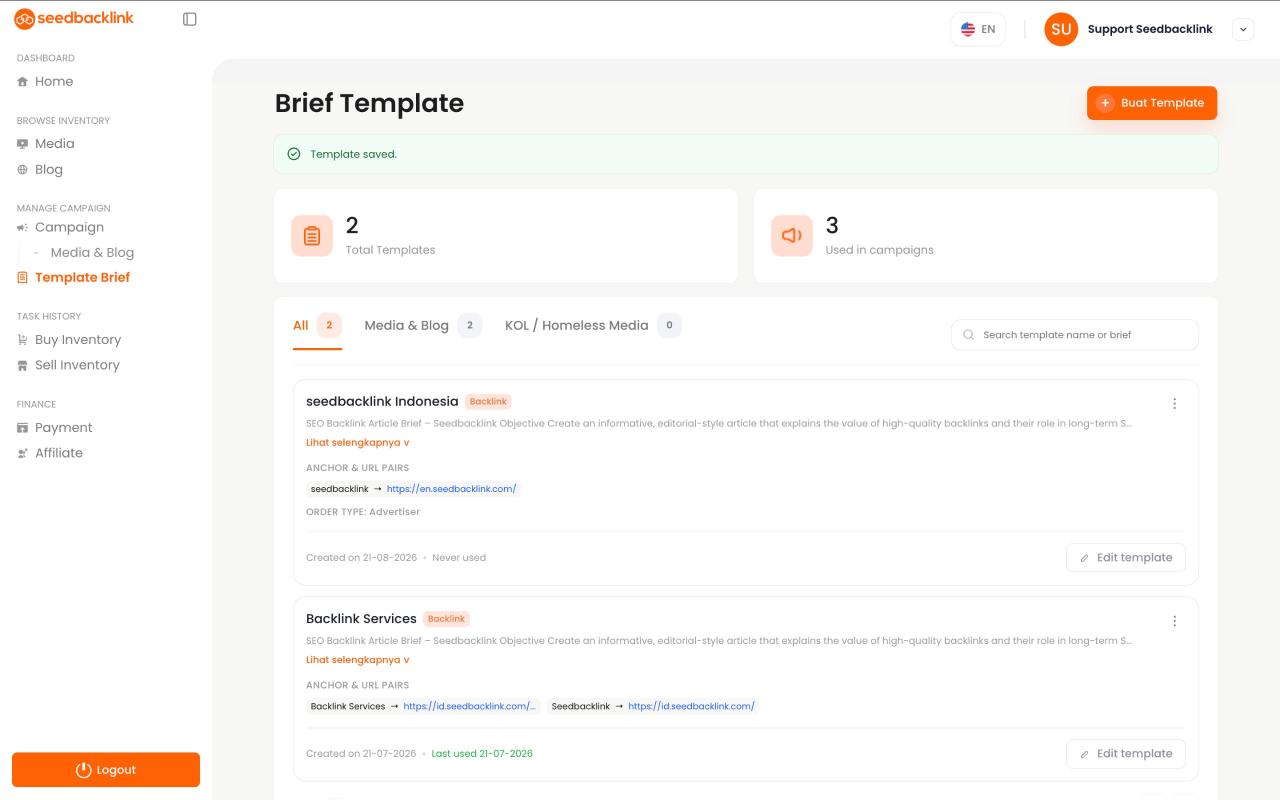
To create one, open the Manage Campaign menu on the left side, then select Template Brief. Once you are on the Template Brief page, click the Buat Template button in the top-right corner.
You can then create a brief template that can be reused across different campaigns, making the ordering process faster and more convenient.
Fill in the Brief Template
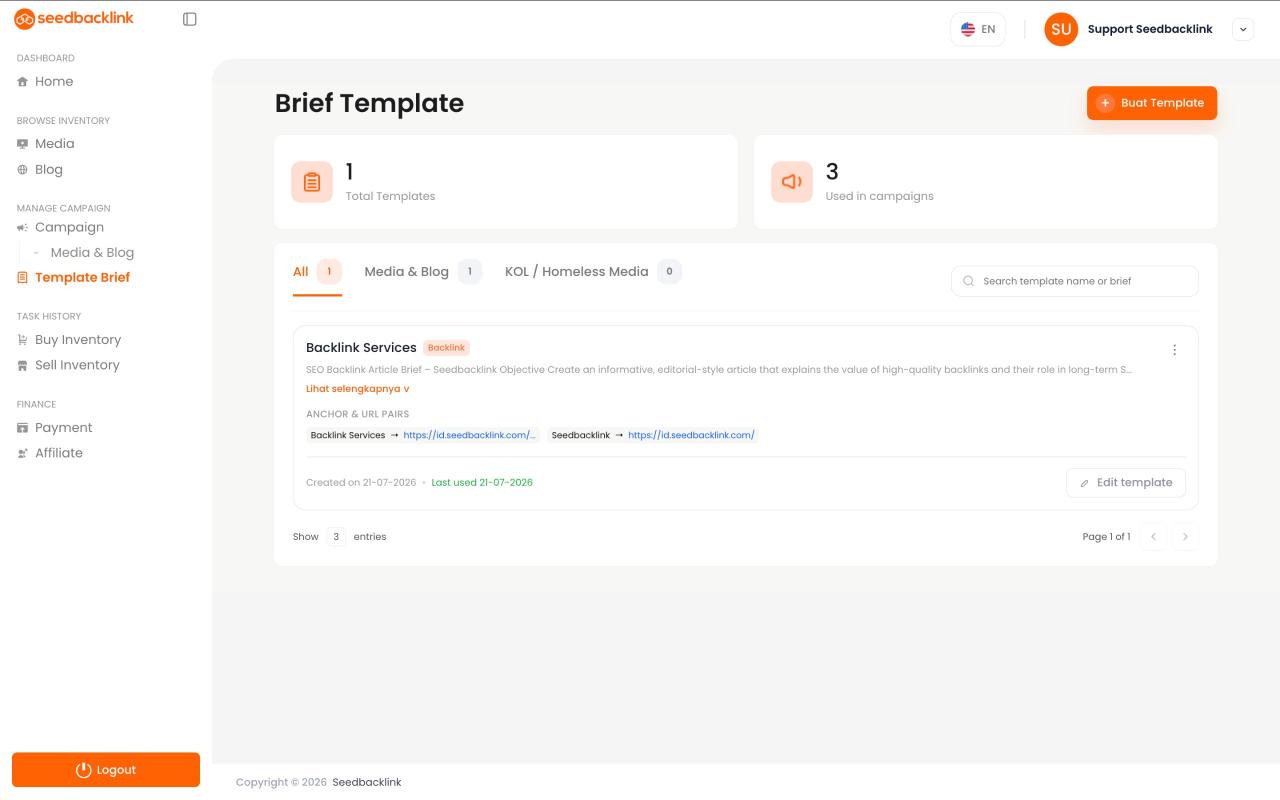
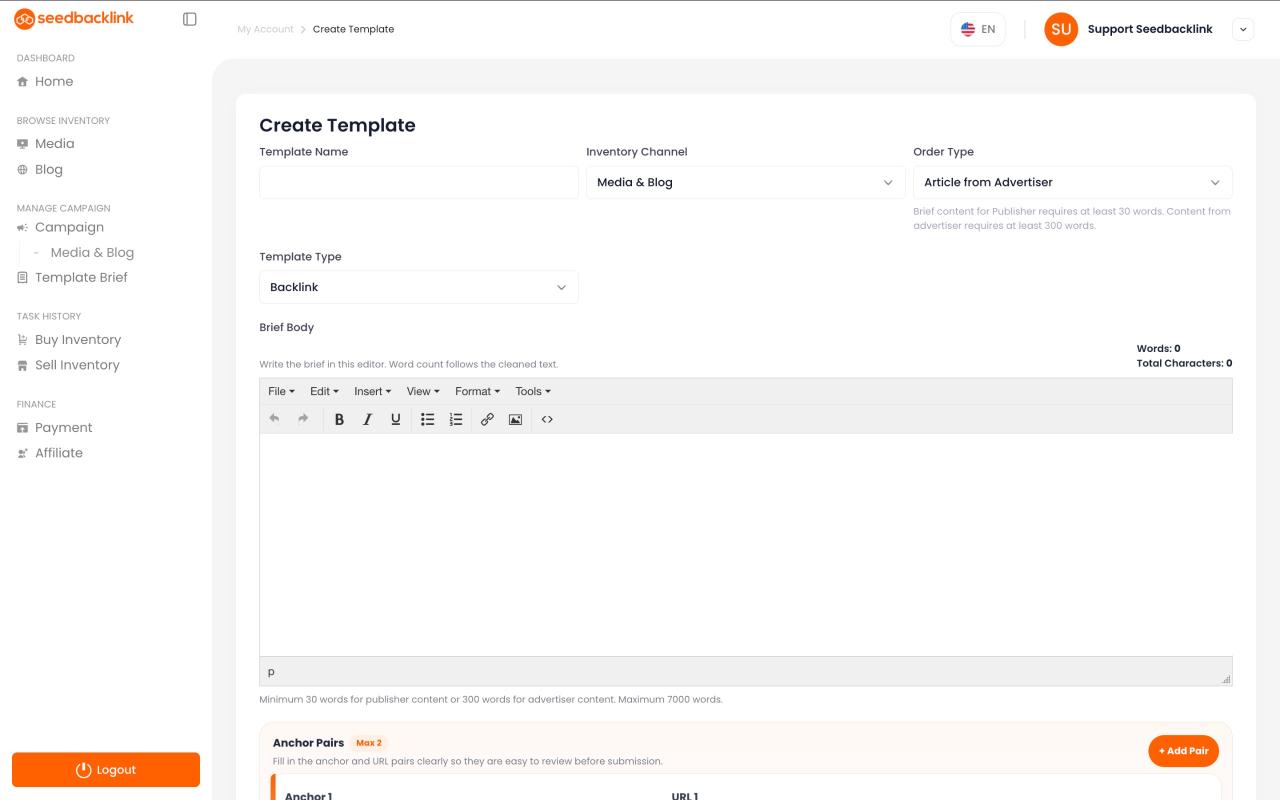
Once you are on the Create Template page, complete all the required information, such as Template Name, Inventory Channel, Template Type, and the Brief Body. Make sure the brief is generic enough to be reused across multiple campaigns.
You can also add frequently used Anchor Text and URL details to make the template even more convenient for future orders.
By using a reusable brief, you don’t need to create a new template every time you place an order. Once all the information has been completed and saved, the template will appear as shown in the image above and will be ready to use for future campaigns.
Use a Brief Template for a New Campaign
After successfully creating and saving a Brief Template, you can reuse it for your next campaign without having to write the same brief from scratch.
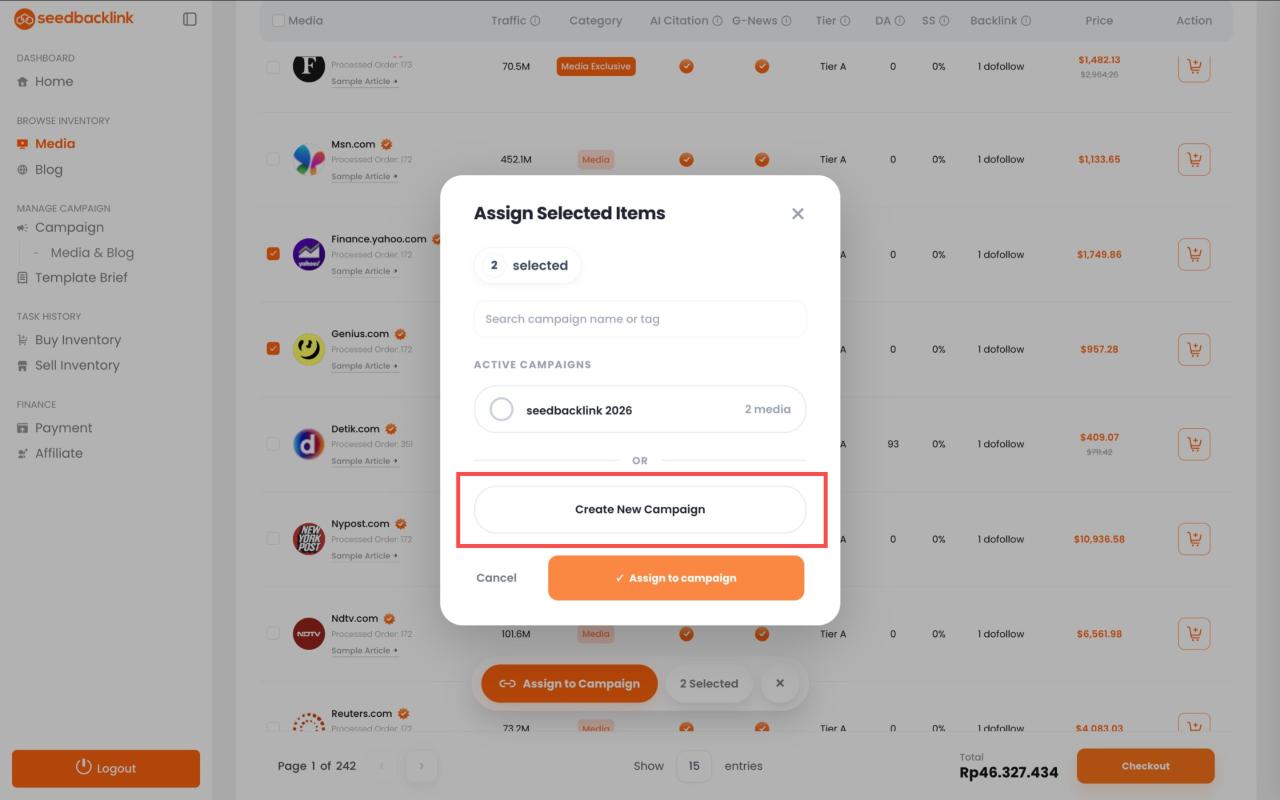
Select the media or blog you want to order, then click the cart icon as usual. When the campaign selection appears, click Buat Campaign Baru, for example with the name Backlink Services 2, and then use the brief template you created earlier.
After creating the new campaign, open Manage Campaign → Media & Blog, then click Edit Draft on the newly created campaign, following the same steps explained earlier.
Apply the Brief Template
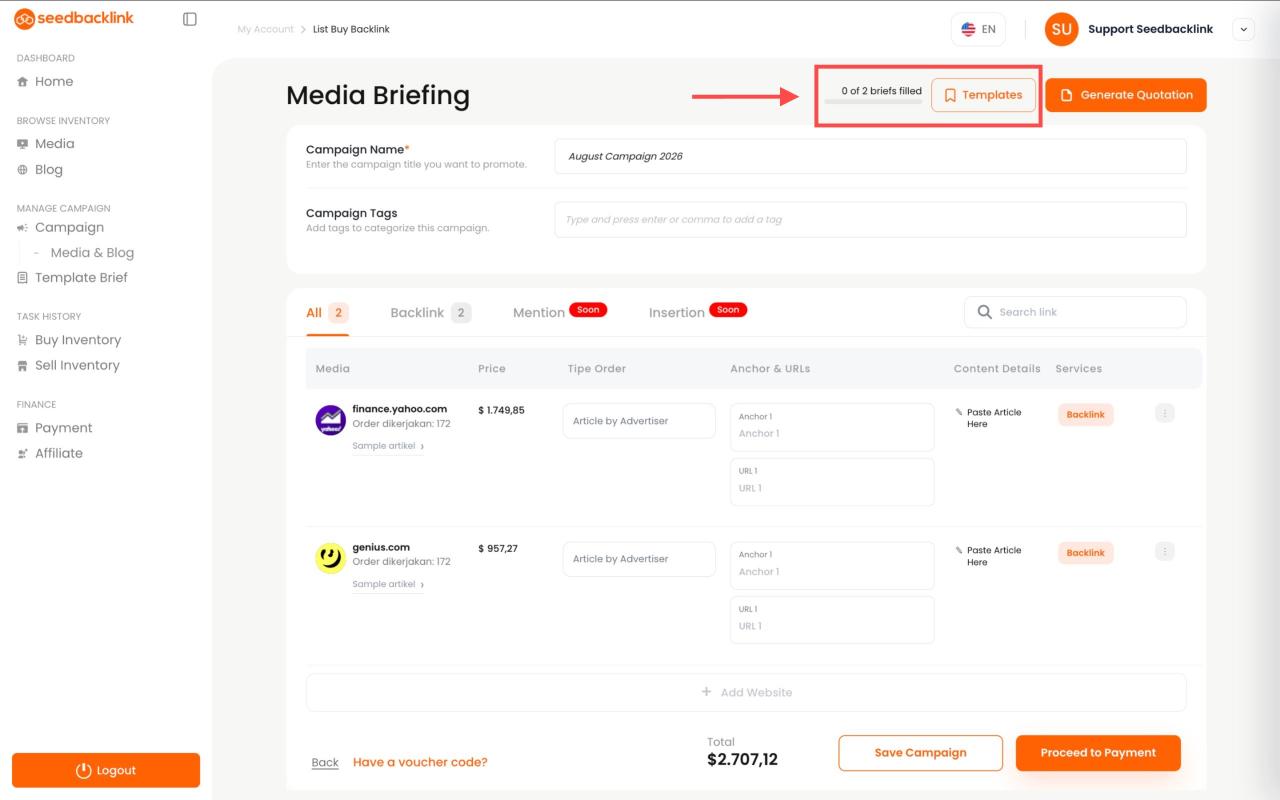
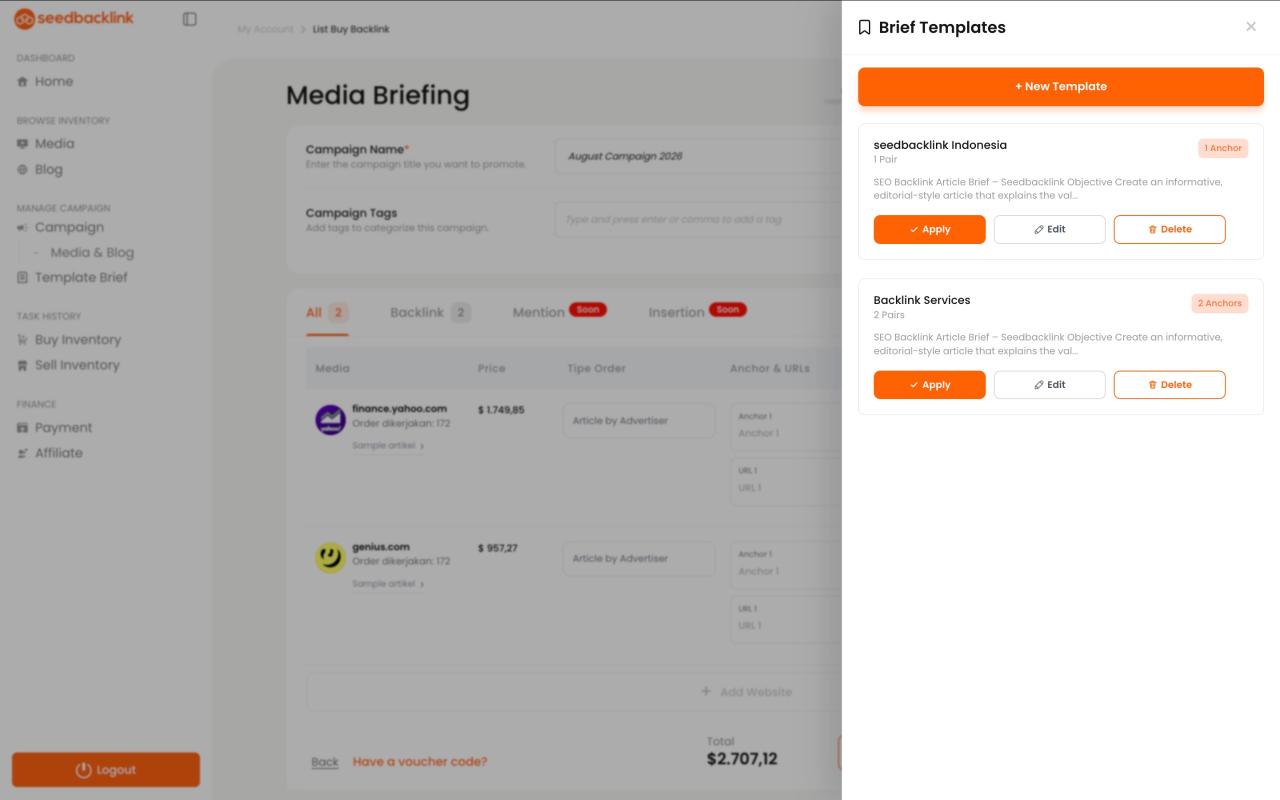
On the Media Briefing page, click the Templates button in the top-right corner. All the templates you have previously saved will be displayed.
Select the template you want to use, then click Apply to apply it to the campaign.
Select the Target Website
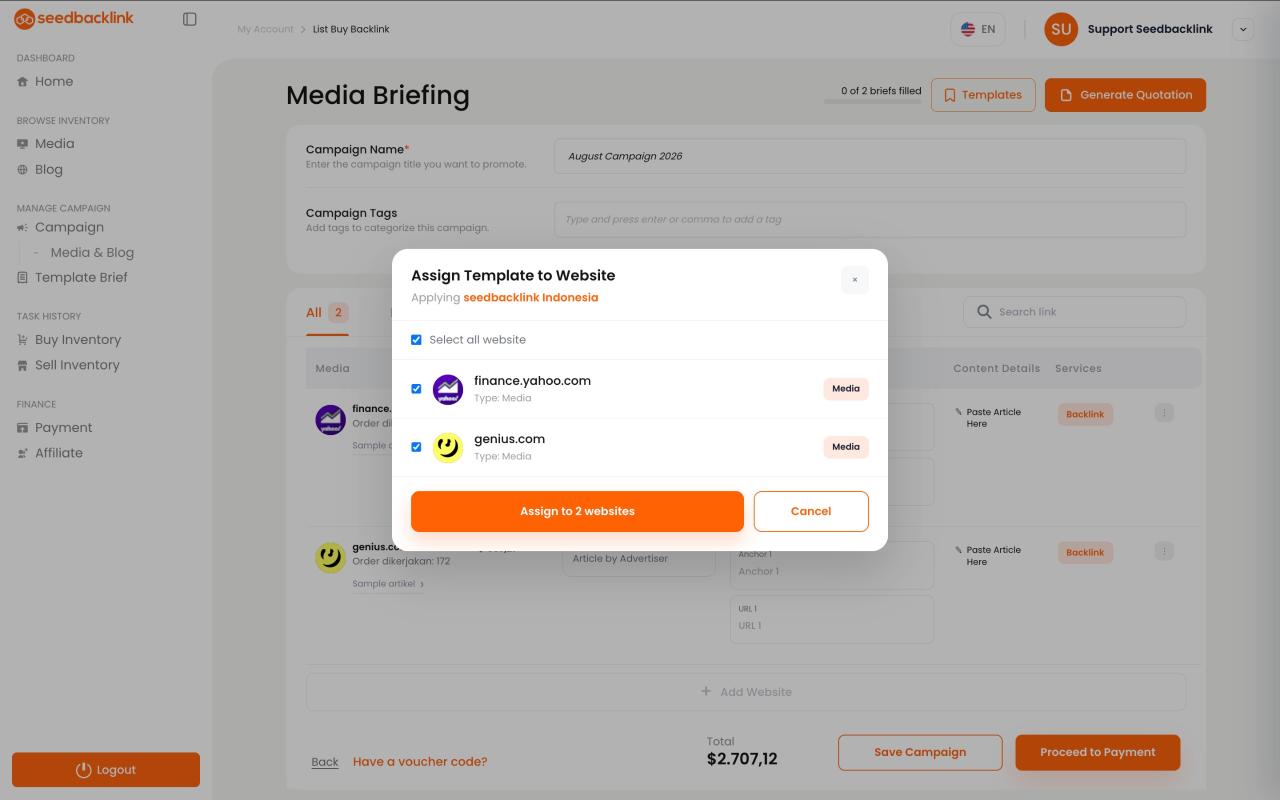
After clicking Apply, a list of websites included in the campaign will appear.
- If the campaign contains only 1 website, select that website and click Assign to 1 Website.
- If the campaign contains multiple websites, you can select specific websites or use the Select All Website option to apply the template to all websites at once.
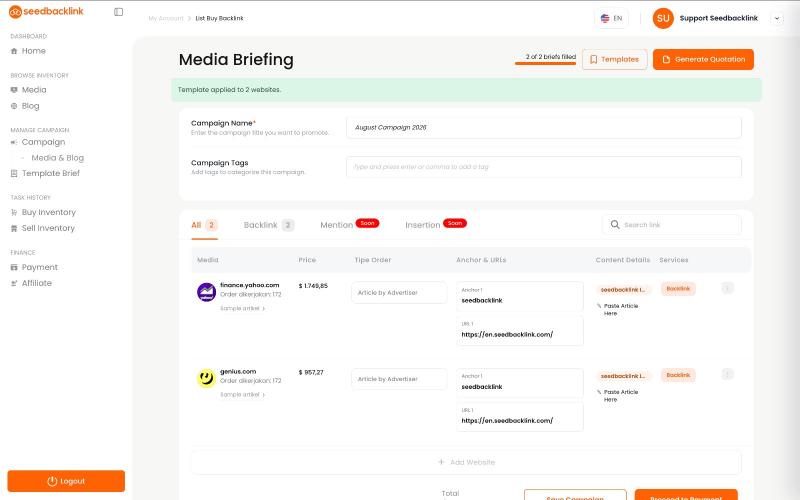
Once the template has been assigned, all the brief details, including the Anchor Text and URL saved in the template, will automatically be filled in for the selected websites.
Complete the Order
The template has now been successfully applied to the campaign. You can review the brief, make any necessary adjustments, and then proceed to Proses Pembayaran to complete your order.
That’s it! With the Template Brief feature, you don’t have to create the same brief repeatedly. Simply create it once, save it as a template, and reuse it for your future campaigns to make the ordering process faster and more efficient.
If you need further assistance, please contact the seedbacklink support team via WhatsApp or our official email at support@seedbacklink.com. Our team will be happy to help.